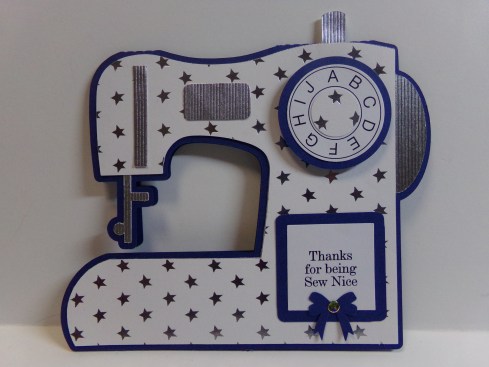
Hello all! This week for The Cutting Cafe design team, I used the Sewing Machine Set which contains a card and a box version. I made two thank you cards, appropriate for any time but especially now.
I really like the way they turned out. Here are individual pictures…
White and Silver Version
Here’s the Blue Version
Stop by The Cutting Cafe Blog on the 7th and 21st of each month to see all of the design team projects. Leave a comment and you will be entered into a drawing to win three free files. Thanks for stopping by and here is my video…
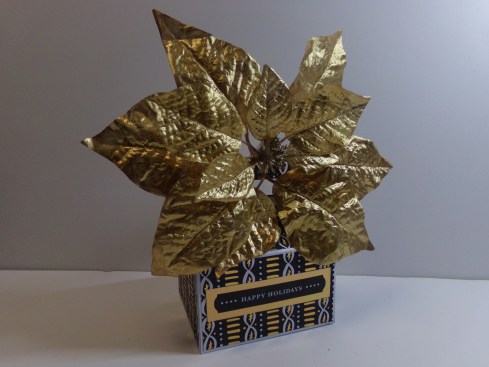
Hey all! Christmas is just about a month and a half away! Where did 2016 go? It was just summer!!! Well it is time to get started making those little gifts for family, friends, co-workers, etc.! The Cutting Cafe has the perfect new file to help you out with treat giving.
The Gable Box file come with a lot of variety so that you can customize your box for the occasion. There are windows that come in different shapes, some have words in the window. You can choose straight edge or scalloped edge. There are toppers you can add.
I made the plain box in white and used a black/gold/white paper for the topper pieces, then added a sentiment from the paper stack, and finally added a HUGE gold poinsettia clip that is just over the top! The recipient can take the clip off and use it for decor or add to a package of their own.
Here is a view of it without the poinsettia…
Here is the box without the Poinsettia.
I see a lot of these in my future as the larger size can hold little gifts and the mini ones can be used for little candy gifts or favors. Here is one more view with the huge flower…
Another view
Stop by The Cutting Cafe Blog on the 7th and 21st of each month to view all of the design team projects as those are our posting days. Leave a comment as we love to read them, but you will also be entered into a drawing to win three free files of your choice! Thanks for stopping by! As usual, here’s my video…
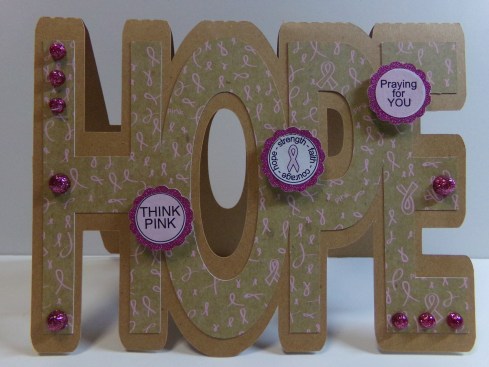
Today for The Cutting Cafe, the design team worked on things for Breast Cancer Awareness Month. I know a couple people, including a former co-worker, Molly, and my cousin Kim who have both just beat breast cancer and I am very happy for both of them! It takes a lot of prayer and support for a person to make it through and these two are living proof that survival does happen and that God has the last word!
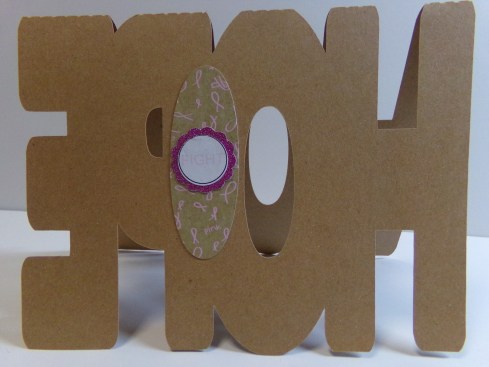
I used the kiss bottoms as sentiments on the card and added glittered scallops and half back pearls. On the back, I added a reminder…
On the back I added a reminder to fight!
Stop by The Cutting Cafe Blog to see all the design team projects. We post on the 7th and 21st of each month. Leave a comment to get a chance to win three files of your choice! Thanks for stopping by and here’s my video with all the details…
Hello there! It has been a month since I posted anything! I am sorry for the wait! But today I have two cute milk cartons I made for The Cutting Cafe‘s Design Team! These will house goodies for my god children. I used the Halloween and Fall Milk Carton cutting file. The file comes with several cut outs. I used the leaf and the pumpkin and added acetate to the window cutout.
Fall Themed Milk Cartons
My god son is nine and absolutely hates glitter so I still had to bling his up, just with acrylic pieces…
This one is for my god son
Back side
My god daughter is 3 1/2 and loves glitter! So for hers, I used glitter paper and some glittered embellishments…
This one is for my god daughter
Here is the back. See the bling on the border at the bottom!
Be sure to stop by the Cutting Cafe Blog and see all of the design team inspiration which we post on the 7th and 21st of each month. Leave a comment and you will be entered into a drawing to win three free files of your choice. The winner is randomly pulled on the next design team posting date. Plus we love to read your comments!
Thanks so much for stopping by! Here is my video that explains thing a bit more in detail…
What is a blessings book? When you are facing challenges or feeling sad, it is a place to write down the blessings you have received in your life so you can remind yourself that if God blessed you once, He can bless you again!
Make sure to stop by The Cutting Cafe Blog to see all the design team projects made with this set. Leave a comment and you will be entered into a drawing to win three free files! Continue reading →
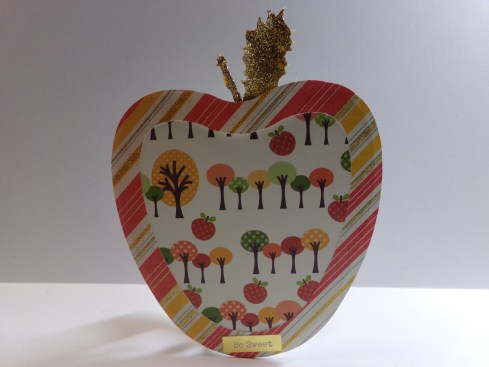
I used the top and the back of the treat cup and backed it with white chip board. I added an easel on the back.
Apple Treat Cup Card Picture Frame Back
I left the top open so I can slide a photo inside. I added a gold glittered stem and leaf and a gold sticker that says So Sweet.
Apple Treat Cup Card Picture Frame Front View
Be sure to stop by The Cutting Cafe Blog to see this week’s design team projects. I am sure the team will have some fantastic projects! Thanks for stopping by! Here is my video…
Yes, I know July is over, but Christmas is still coming, so get prepared with The Cutting Cafe! The design team is featuring Christmas projects this week on the blog. Since we could choose any Christmas file we wanted to, there is sure to be a lot of variety as well as inspiration! Be sure to leave a comment so that you can be entered into a drawing for three files of your choice which will be announced on the design team post for August 21.
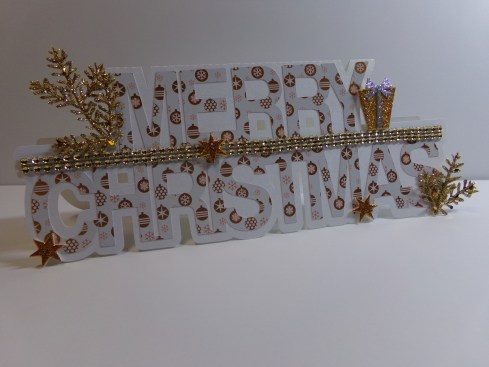
I used the Merry Christmas Word Shaped Card and I love it! I used bling…paper, trim, embellishments…to make this card sing Merry Christmas!
Are you ready for Christmas projects? If not, don’t let them sneak up on you! Get a jump on them now. Check out the multitude of Christmas files at The Cutting Cafe. You will surely find many you can use. Thanks for stopping by! Here is my video on the project…
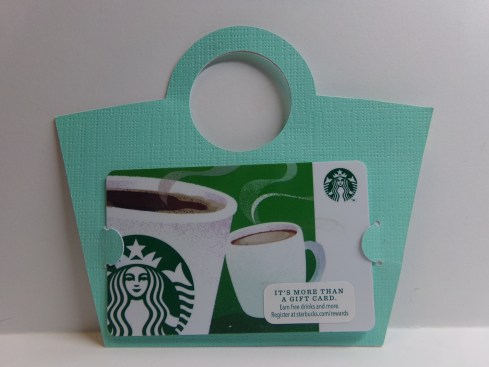
I am loving this cute gift card holder I made! I used two stamp sets from The Cutting Cafe Shop, which is the sister store to The Cutting Cafe. On the front, I stamped the cardstock with the Birthday Party Background stamp and the make a wish sentiment is from the Birthday Party Fun stamp set. The base is cut from gold metallic paper. Here is the back…
Back
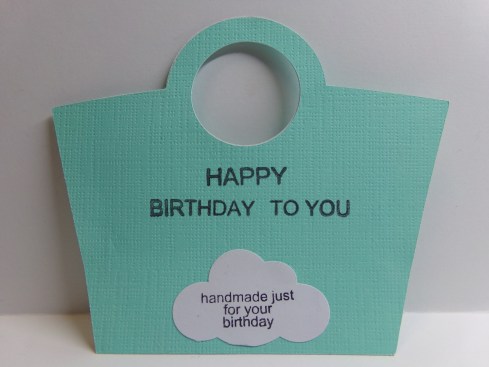
The additional element to this is the insert that holds the gift card…
Gift card holder insert
The gift card goes on the front of the insert and you can add a note or any time of sentiments on the back. I used two sentiment stamps from the Birthday Party Fun set…
Gift card holder insert back
I really liked the way this came out and it is a quick and easy way to give a gift.
Holder and insert
The stamp set are so nice. The shop carries several now but you can also have custom stamps made. You can have your artwork transformed into your own stamps! Anyway, thanks for stopping by. As always here is a video for you…
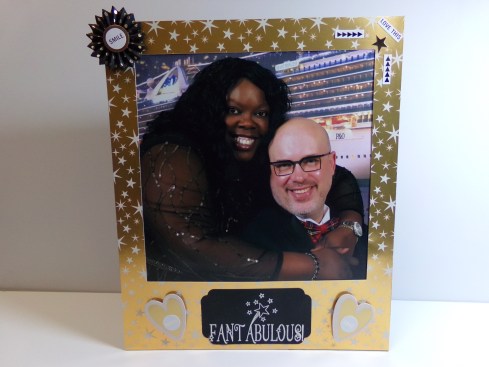
Hello all! I am a couple of days late posting my design team project for The Cutting Cafe, but it is too cute not to share! This week we could choose any file we wanted to but we had to super-size it, that is, make it larger.
I took the frame from the Polaroid and Camera Fun Set and made it 10″ x 11 3/4″ so it could hold a 8″ x 10″ picture. I also used my new custom stamp, Fantabulous, from The Cutting Cafe Shop. I added some die cuts, a rosette, and some stickers and I love it.
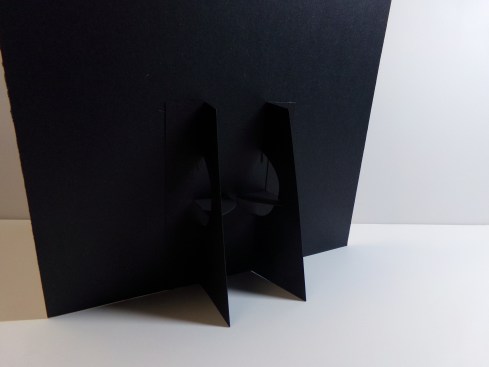
I added easels to the back.
Make sure you check out The Cutting Cafe Blog as there are some terrific super-sized projects to see! Leave a comment and you just might win three files of your choice in a drawing for those who left comments.
Thanks so much for watching and here is a video of my project…
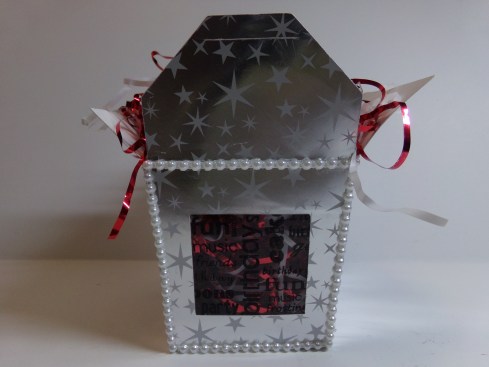
The Cutting Cafe Shop is the sister store to The Cutting Cafe. The shop sells paper, ribbon, and stamp sets like the Birthday Party Background one that I have used here. I stamped it with Staz On ink onto clear cardstock, which is also sold at the shop. I used white paper to better show the stamp but here is what it looks like without it…
This shows the window in the box without the white card that I used to help show the words better.
The actual box is made with the Chinese Take Out Box cutting template. This can hold candy or a little gift. And it is quick and easy to do! I just added flowers on the sides but you can attach a handle using brads as the file even cuts the holes for you to use.
I added a flower to the side but you can attach a handle to each side if you choose.
Thanks for stopping by! Here is a video before you go…
I am an association management professional who has always loved fashion, sewing, crafting, writing, cooking, and shopping. I am married to a wonderful man and have a great family foundation. I like to share inspiration with as well as get information from others and hope this site will let me do just that. Happy crafting!